How to Build a Printer Stand: 16-Piece Cut List and DIY Plan
Build a sturdy 26-by-17.5-inch rustic printer stand using standard lumber with this complete 16-piece cut list and step-by-step assembly guide.
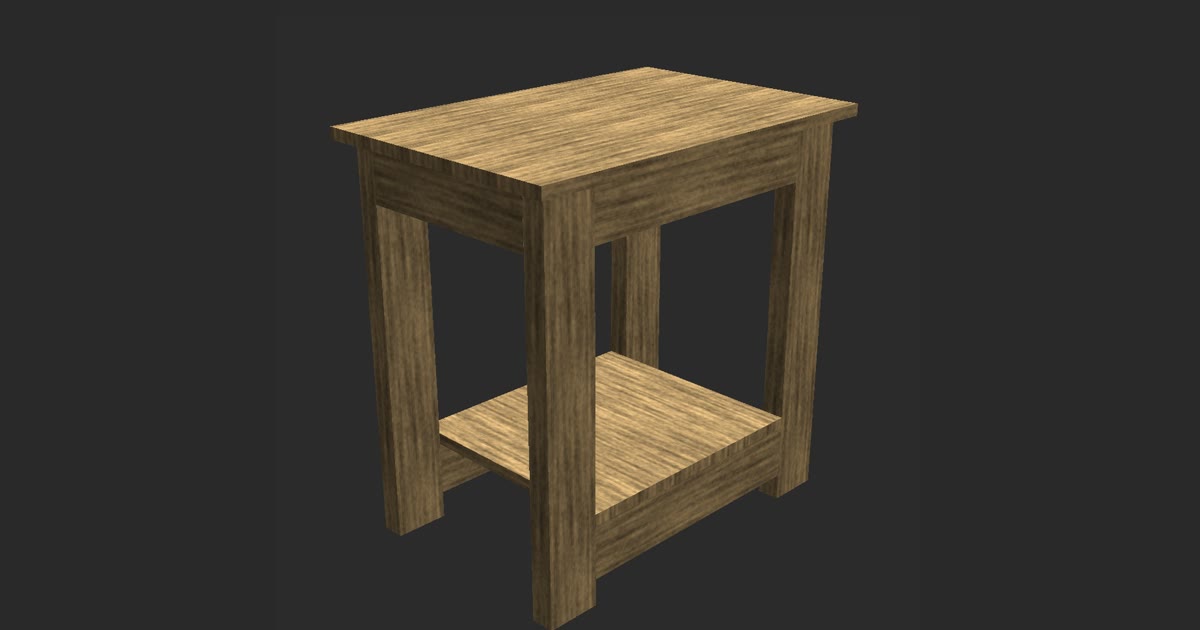
Learn how to build a printer stand using standard lumber, an exact 16-piece cut list, and simple joints. A finished stand measuring 26 inches wide, 17.5 inches deep, and 26 inches tall isolates printing vibration and frees up primary desk space.
This design was made in TimberTinker and built board by board on film; the guide's video shows the same build. Follow along with the stock dimensions, frame orientation, and fastening details below.
| Finished size | 26 in wide × 17.5 in deep × 26 in tall |
|---|---|
| Lumber | 2x4, panel, board |
| Shelf height | 6 in |
| Pieces | 16 |
| Build order | legs → aprons → shelf → top |
Cut list
| Qty | Part | Lumber | Length |
|---|---|---|---|
| 4 | Leg | 2x4 | 25.25 in |
| 2 | Apron | 2x4 | 17 in |
| 2 | Apron | 2x4 | 12.5 in |
| 2 | Shelf | 2x4 | 17 in |
| 1 | Shelf | panel | 15.5 in |
| 5 | Top board | board | 26 in |
Step by step
- Cut all 16 components to finished lengths according to the cut list.
- Drill pocket holes in the 17-inch and 12.5-inch aprons and the 17-inch shelf supports.
- Orient the 2x4 legs with their 3.5-inch faces pointing front and rear.
- Fasten the aprons flush with the leg tops using 2-1/2-inch pocket hole screws to build a 24-by-15.5-inch frame.
- Mark legs 6 inches above the floor and attach the two 17-inch shelf supports with 2-1/2-inch pocket hole screws.
- Secure the 15.5-inch shelf panel to the supports using 1-1/4-inch screws.
- Lay the five 26-inch top boards edge to edge, centering them over the base with a 1-inch overhang.
- Fasten the top boards to the aprons and sand the entire stand before applying finish.
Printer Stand Sizing and Proportions
A desktop printer requires a rigid base that stays put during high-speed printing runs. This rustic printer stand has a finished footprint measuring 26 inches wide, 17.5 inches deep, and 26 inches tall. Placing the unit slightly below standard desk height keeps top-loading scanner lids and paper trays within arm's reach.
The top surface extends beyond the base frame to create a balanced profile. The top overhangs the frame by 1 in on all four sides. This perimeter space lets you run cords along the edges or set the stand against baseboards without pinching power cables. Beneath the main tabletop, the open frame leaves room for daily office supplies.
Ground clearance is built into the lower assembly. The single lower shelf sits 6 inches up from the floor, measured from the ground to the bottom face of the shelf boards. This gap keeps stored reams of paper away from floor debris and leaves room to run a vacuum underneath.
Materials and the Complete 16-Piece Cut List
Building this stand requires three lumber profiles: 2x4 construction lumber, boards, and a 0.75-inch thick panel. Always work with actual lumber dimensions rather than nominal names. A 2x4 is actually 1.5 in by 3.5 in. A board is actually 0.75 in by 3.5 in. A panel is actually 0.75 in by 17 in.
The project uses 16 pieces in total. From your 2x4 lumber, cut four legs to 25.25 inches. For the upper aprons, cut two pieces to 17 inches and two pieces to 12.5 inches. For the shelf supports, cut two 2x4 pieces to 17 inches. From your 0.75-inch panel stock, cut one shelf piece to 15.5 inches. Finally, cut five top boards to 26 inches each.
Before making any cuts, check your stock for cups or warps. If you want to preview the parts or export printable cut sheets before heading to your miter saw, TimberTinker lets you model the lumber dimensions and check your joinery.
Step-by-Step Assembly: How to Build a Printer Stand
Assembly follows an orderly sequence: legs, then aprons, then shelf, then top. Drill pocket holes into the ends of the 17-inch and 12.5-inch 2x4 aprons using a pocket hole jig set for 1.5-inch material. Use 2-1/2-inch pocket hole screws for all 2x4 joints to pull the connections tight without splitting the wood.
Orient the four legs so the wide 3.5-inch faces face toward the front and rear, while the narrow 1.5-inch edges face the sides. Fasten the two 17-inch aprons between the wide faces of the legs, flush with the top ends. Then attach the two 12.5-inch side aprons between the narrow edges. This specific leg orientation creates an outer frame that measures exactly 24 inches wide by 15.5 inches deep.
Next, assemble the lower shelf. Mark reference lines 6 inches up from the bottom of each leg along the inside faces. Secure the two 17-inch 2x4 shelf supports between the legs using 2-1/2-inch pocket hole screws. Set the 15.5-inch shelf panel across these supports and fasten it down with 1-1/4-inch wood screws driven into predrilled pilot holes.
Finish by mounting the tabletop. Lay the five 26-inch top boards across the upper aprons edge to edge. Five boards at 3.5 inches wide equal 17.5 inches in depth. Center the tabletop over the frame so it overhangs by 1 inch on all four sides. Secure the top boards from underneath using pocket hole screws driven upward through the aprons, or secure them with tabletop fasteners.
Sanding and Applying a Protective Finish
Preparing the wood begins with leveling the seams between the top planks. Sand the tabletop with 80-grit sandpaper on a random orbital sander to smooth transitions between boards. Move to 120-grit paper over the entire frame, and finish with 180-grit abrasive on all surfaces. Break sharp corners by hand to prevent splinters.
Wipe away fine dust with a dry tack cloth before finishing. Apply a penetrating wood stain or leave the lumber natural. Once the stain dries, seal the piece with two coats of clear satin polyurethane. Focus on the top surface and the lower shelf to protect the wood from toner spills and water rings.
Building your own printer stand yields a sturdy office companion tailored to daily printing tasks. With square joints, correct leg orientation, and dependable pocket-hole fasteners, this rustic stand will handle heavy office gear for years.
Questions
How much weight can a DIY 2x4 printer stand support?
A stand built with 2x4 legs and aprons easily holds heavy laser printers, spare paper reams, and extra hardware without sagging.
How can I manage printer power cords and USB cables on a wooden stand?
The 1-inch overhang leaves room to run cords behind the frame. You can tack cable clips to the back legs or bore a grommet hole through the rear top board.

Try TimberTinker for yourself.
Get TimberTinkerWant more like this? Leave your email and I'll send the good stuff only.