How to Build a Plant Stand: Farmhouse DIY Plan
Build a sturdy, two-shelf farmhouse plant stand using standard lumber with this complete 17-piece cut list and sequential assembly plan.
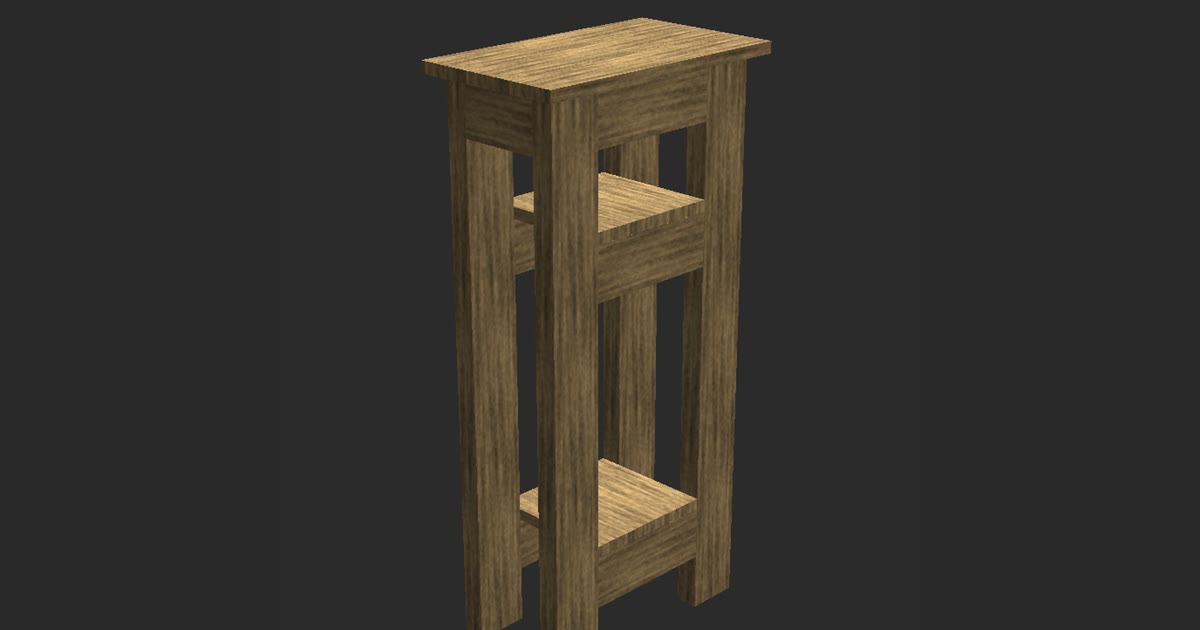
Learning how to build a plant stand starts with assembling a frame from dimensional lumber cut to exact lengths. You join four upright legs using pocket hole joinery or counterbored wood screws, then secure shelf rails at marked heights. Three surface boards attach flush with the perimeter. This farmhouse design holds heavy potted plants across two tiers while taking up minimal floor area.
This guide covers the complete 17-piece cut list along with lumber dimensions. It also details the step-by-step assembly order and finishing methods that protect the wood from moisture.
| Finished size | 18 in wide × 10.5 in deep × 37 in tall |
|---|---|
| Lumber | 2x4, panel, board |
| Shelf heights | 8 in, 28 in |
| Pieces | 17 |
| Build order | legs → aprons → shelf-1 → shelf-2 → top |
Cut list
| Qty | Part | Lumber | Length |
|---|---|---|---|
| 4 | Leg | 2x4 | 36.25 in |
| 2 | Apron | 2x4 | 9 in |
| 2 | Apron | 2x4 | 5.5 in |
| 2 | Shelf-1 | 2x4 | 9 in |
| 1 | Shelf-1 | panel | 8.5 in |
| 2 | Shelf-2 | 2x4 | 9 in |
| 1 | Shelf-2 | panel | 8.5 in |
| 3 | Top board | board | 18 in |
Step by step
- Cut all 17 pieces from the lumber stock according to the cut list.
- Assemble two leg frames by connecting pairs of 36.25-inch legs with the 5.5-inch aprons.
- Join the two leg frames together using the two 9-inch aprons to form the top perimeter frame.
- Measure 8 inches from the leg bottoms and secure the two 9-inch Shelf-1 supports between the legs.
- Fasten the 8.5-inch Shelf-1 panel securely across the lower supports.
- Measure 28 inches from the leg bottoms and attach the two 9-inch Shelf-2 supports to the legs.
- Fasten the 8.5-inch Shelf-2 panel across the middle supports.
- Fasten the three 18-inch top boards across the upper aprons flush with the frame.
- Sand all surfaces smooth and apply a water-resistant exterior sealer or enamel.
Dimensions and Proportions of the Farmhouse Stand
The finished plant stand measures 18 inches wide, 10.5 inches deep, and 37 inches tall. These proportions give the stand a slender footprint suitable for living room corners or positions beside sunny windows. Because potted plants can become top-heavy as foliage grows, keeping the base stable without widening the footprint makes the unit practical for compact rooms.
The vertical spacing features two interior shelves positioned at specific heights from the ground. Shelf-1 sits 8 inches up from the floor, creating a low platform for heavier ceramic pots or watering cans. Shelf-2 is positioned at the 28-inch mark, leaving ample vertical clearance between the tiers so foliage on the lower shelf has room to expand.
At the top of the 37-inch unit, the surface boards sit flush with the outer frame without an overhang. Traditional end tables frequently feature an overhanging top lip, but a flush top matches utilitarian farmhouse design. It also prevents pots placed near the edge from catching on curtains or bumped shoulders in narrow hallways.
Lumber Selection and the Complete 17-Piece Cut List
Working with off-the-shelf lumber requires knowing the difference between nominal names and actual board dimensions. A standard 2x4 actually measures 1.5 inches thick by 3.5 inches wide. The panels used for the shelf platforms measure 0.75 inches thick by 9 inches wide. The top boards measure 0.75 inches thick by 3.5 inches wide.
A precise cut list prevents wasteful mistakes at the miter saw. When planning this design in TimberTinker, the parts were grouped by material thickness so every cut could be checked against the 3D model before cutting stock. The whole project requires exactly 17 components cut from these three stock materials. Always mark cut lines with a sharp pencil or marking knife to preserve accurate lengths.
To prepare the stock, cut the four legs from 2x4 lumber at 36.25 inches. Cut four 2x4 aprons: two pieces at 9 inches and two pieces at 5.5 inches. For Shelf-1, cut two 2x4 rails to 9 inches and one panel to 8.5 inches. For Shelf-2, cut two 2x4 rails to 9 inches and one panel to 8.5 inches. Finally, cut three top boards to 18 inches.
Step-by-Step Assembly: How to Build a Plant Stand
Assembly follows a specific build order: legs first, then aprons, Shelf-1, Shelf-2, and finally the top. Begin with the four 36.25-inch 2x4 legs and the aprons. Arrange two legs flat on your workbench and connect them across the top using a 5.5-inch 2x4 apron, joining them flush with pocket hole screws or counterbored wood screws. Repeat this step for the opposite side to create two leg frames. Stand both leg assemblies upright and connect them with the two 9-inch 2x4 aprons across the top.
Once the upper perimeter is square and secured, install the lower tier components for Shelf-1. Measure and mark 8 inches from the bottom of each leg. Position the two 9-inch 2x4 shelf supports between the legs at this line, driving 2.5-inch pocket screws into the uprights. Drop the 0.75-inch by 9-inch panel piece cut to 8.5 inches across these supports to form the bottom shelf platform.
Move up to Shelf-2, located at the 28-inch mark. Clamp the two 9-inch 2x4 supports in place at that height, then fasten them with pocket screws into the leg faces. Place the second 8.5-inch panel piece across these supports and fasten it from below. This design was created in TimberTinker and built board by board on film, matching the sequence shown in the guide's video.
Complete the construction by installing the top surface. The top consists of three boards measuring 0.75 inches thick, 3.5 inches wide, and 18 inches long. Position the three boards across the top aprons side by side so the ends and outer edges align flush with the outside leg faces. Secure each board into the upper frame using countersunk trim screws or pocket screws driven upward from the inside aprons.
Sanding, Sealing, and Water-Resistant Finishing
Proper sanding prepares raw lumber for stain or paint while removing manufacturing stamps and rough spots. Begin sanding with 120-grit sandpaper over all flat faces to remove mill glaze and saw marks. Follow with 180-grit paper, smoothing the joints and softening sharp corners. Easing the edges slightly prevents splintering and allows protective coatings to adhere evenly.
Houseplants present a constant moisture hazard because water can escape pots or overflow saucers during watering. Spar urethane or an exterior-rated polyurethane provides a dependable barrier against moisture. If you prefer a painted farmhouse appearance, apply an exterior-grade primer followed by two coats of exterior enamel paint, which repels water better than standard indoor wall paint.
Pay close attention to end grain and horizontal shelf surfaces during finish application. The cut ends of 2x4s absorb liquids rapidly through capillary action, so apply an extra coat of sealant to exposed joint lines. Allow the finish to cure completely for 72 hours before setting plant saucers or pots onto the surfaces.
Building your own plant stand gives you a stable platform that holds potted plants in a compact vertical profile. Built with standard dimensional lumber and sealed against moisture, this farmhouse stand will reliably support your indoor greenery for years.
Questions
What type of wood finish best protects an indoor plant stand from water runoff?
Spar urethane or an exterior-grade polyurethane provides strong protection against water runoff. These finishes form a flexible, waterproof coating over the wood grain that resists water rings and standing moisture. If you prefer paint, choose an exterior oil-based or acrylic enamel over a stain-blocking primer.
How much weight can a 2x4 framed plant stand safely support?
A plant stand built with 2x4 uprights and direct mechanical fasteners supports heavy loads distributed across its shelves without sagging. The 1.5-inch by 3.5-inch leg lumber handles substantial downward compression, making it suitable for ceramic planters filled with wet potting soil.

Try TimberTinker for yourself.
Get TimberTinkerWant more like this? Leave your email and I'll send the good stuff only.