How to Build a Side Table: Complete DIY Pine Plan
Build a sturdy 24-by-30-inch pine side table using standard 2x4 lumber and a panel top with this complete step-by-step guide.
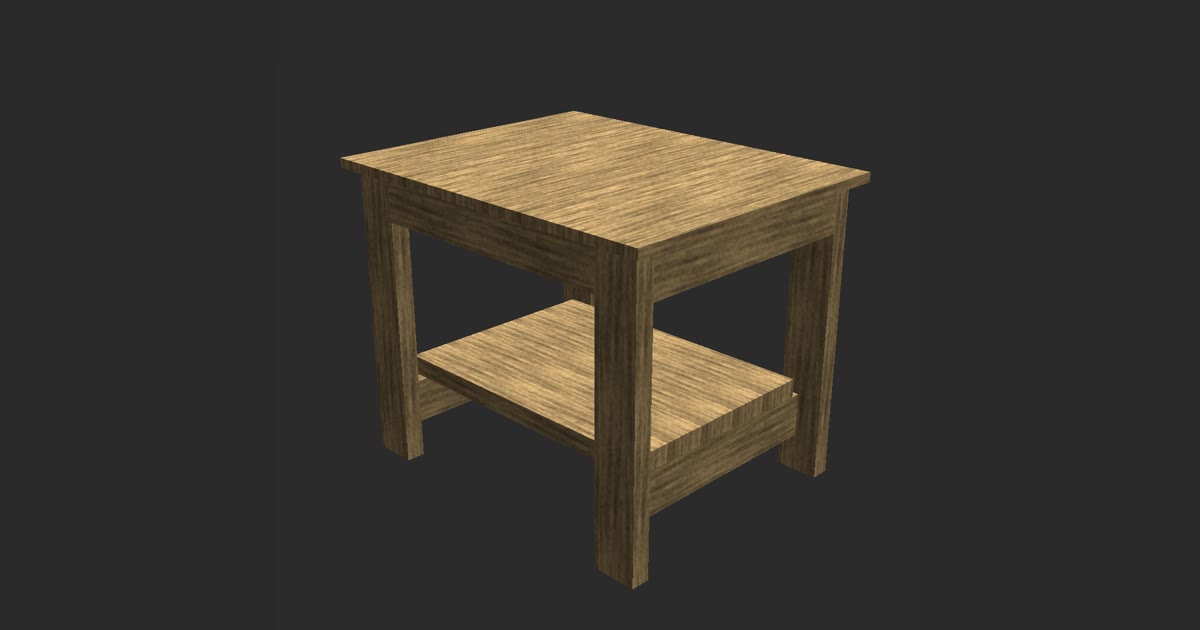
To build a side table from pine lumber, cut your 2x4 boards and top panel to size, assemble the four-leg base with aprons, install the lower shelf slats, and secure the tabletop. This project produces a finished table measuring 24 inches wide, 30 inches deep, and 24 inches tall that sits flush beside an armchair or sofa.
This guide covers the completed frame dimensions, the verified 16-piece cut list, step-by-step assembly instructions, and methods for sanding and staining pine without blotching.
| Finished size | 24 in wide × 30 in deep × 24 in tall |
|---|---|
| Lumber | 2x4, panel |
| Pieces | 16 |
| Build order | legs → aprons → shelf → top |
Cut list
| Qty | Part | Lumber | Length |
|---|---|---|---|
| 4 | Leg | 2x4 | 23.25 in |
| 2 | Apron | 2x4 | 19 in |
| 2 | Apron | 2x4 | 21 in |
| 2 | Shelf | 2x4 | 19 in |
| 5 | Shelf | 2x4 | 24 in |
| 1 | Top board | panel | 24 in |
Step by step
- Cut all 16 pieces from 2x4 lumber and panel stock according to the cut list.
- Drill pocket holes into the inside faces of the four aprons and shelf runners.
- Join two legs together with one 19-inch apron to create the first side assembly.
- Join the other two legs together with the second 19-inch apron to make the matching side assembly.
- Connect both side assemblies together using the two 21-inch aprons to form the outer frame.
- Mount the two 19-inch shelf runners horizontally between the legs near the base.
- Fasten the five 24-inch shelf slats across the shelf runners with even spacing.
- Center the 24-inch by 30-inch top panel over the frame with a 1-inch overhang on all sides and fasten it from below.
Dimensions and Sizing for the Side Table
The completed side table measures 24 inches wide, 30 inches deep, and 24 inches tall. These proportions place the top surface right at the armrest height of common living room seating, offering ample room for a lamp, coasters, and magazines. The 24-inch total height comes from the 0.75-inch top panel resting directly on 23.25-inch tall legs.
The base frame under the top is smaller than the tabletop surface. The outer perimeter of the leg-and-apron frame measures 22 inches wide by 28 inches deep. Because the panel top measures 24 inches wide by 30 inches deep, the top overhangs the frame by 1 inch on all four sides. This 1-inch reveal creates a balanced profile and keeps the table from tipping when bumped.
Prototyping these clearances in TimberTinker helped confirm leg spacing and vertical clearance for the lower shelf before making cuts in the workshop. Checking the 3D model beforehand verifies that the four legs sit flush at the exterior corners and leave practical storage space underneath.
Materials and the Exact 16-Piece Cut List
Construction begins with standard construction-grade 2x4 pine boards and a 3/4-inch wood panel. While lumber is sold under nominal trade names, actual measurements determine your joints. A standard 2x4 is actually 1.5 inches thick by 3.5 inches wide. The tabletop panel is actually 0.75 inches thick by 30 inches wide. Accounting for these true dimensions prevents uneven seams when the frame joins together.
You need exactly 16 cut pieces to complete the entire side table. The structural base requires four legs cut to 23.25 inches from 2x4 stock. The upper perimeter frame uses two 19-inch aprons and two 21-inch aprons. The lower storage shelf requires two 19-inch shelf runners and five 24-inch shelf slats, all milled from 2x4s. Finally, the top board requires one piece cut to 24 inches from the 30-inch-wide, 0.75-inch-thick panel stock.
Checking these 16 parts against the TimberTinker cut list keeps your lumber waste low and your saw setup consistent. Group your cuts by length on the miter saw so you can clamp a stop block in place. Using a stop block for the four 23.25-inch legs and the five 24-inch shelf boards produces identical lengths, which keeps the completed table square.
How to Build a Side Table Step by Step
The build follows an exact order: legs, then aprons, then shelf, then top. This sequence was designed and built board by board on film, matching the demonstration video step for step. Start by setting two 23.25-inch legs on a flat workbench and joining them with one 19-inch apron flush with the top leg ends. Fasten through pocket holes drilled on the inside face of the apron using 2.5-inch pocket screws and wood glue. Repeat this process with the remaining two legs and the second 19-inch apron to make two matching leg assemblies.
Next, connect the two leg assemblies using the two 21-inch aprons. Clamp the parts square on your bench before driving screws into the legs. Because construction 2x4s can carry slight bows, check diagonal measurements across the frame from corner to corner. Matching diagonal lengths confirm that your frame is square. This completed frame forms a box measuring 22 inches by 28 inches on its exterior edges.
Assemble the lower shelf inside the four legs. Fasten the two 19-inch shelf runners horizontally between the legs, setting them roughly 4 to 6 inches above the floor. Lay the five 24-inch shelf slats across the runners. Space the five boards evenly across the shelf frame, leaving small, uniform gaps between slats for air circulation and clean shadow lines. Secure each slat to the runners with counterbored 2.5-inch wood screws from above or pocket screws driven from underneath.
Finish assembly by centering the 24-inch by 30-inch top panel over the frame. Verify the 1-inch overhang on all four sides with a combination square. Secure the top from underneath the aprons using figure-eight fasteners or upward-angled pocket holes drilled through the aprons. Make sure the fastener length does not penetrate through the top face of the 0.75-inch panel.
Sanding, Staining, and Finishing Pine
Pine is a softwood that requires steady prep work before applying any color. Construction lumber often carries mill glaze, ink stamps, and surface dents. Begin sanding with 80-grit abrasive paper on a random orbital sander to level the joints across the aprons and legs. Work through 120-grit paper, then finish with 180-grit paper. Sand with the grain on your final hand pass to clear away any swirl marks left by the machine.
Raw pine absorbs liquid stains unevenly, which causes dark blotches around earlywood and latewood growth rings. To avoid this, wipe a generous coat of pre-stain wood conditioner across all assembled parts. Let the conditioner soak in for 15 minutes, then wipe away any excess liquid with a clean cotton rag. Apply your chosen wood stain within two hours of conditioning for even color saturation across the wood.
Protect the finished side table with a clear topcoat. A satin polyurethane works well on pine tables exposed to daily use from coffee mugs and books. Apply three thin coats of polyurethane with a natural bristle brush or lint-free applicator pad, allowing each layer to dry completely according to the product directions. Sand lightly with 320-grit paper between coats to remove dust nibs and keep the surface smooth.
Building your own pine side table delivers a stable piece of furniture sized for practical daily use. With square cuts, careful joint assembly, and a conditioned finish, standard 2x4 boards become a dependable home addition that stands up to years of service.
Questions
What type of screws and fasteners work best for joining 2x4 table frames?
For 1.5-inch thick 2x4 lumber, use 2.5-inch coarse-thread pocket hole screws paired with wood glue. Coarse threads grip soft pine fibers firmly without stripping. When driving screws through outer faces, use 3-inch construction screws and countersink the heads beneath wood plugs.
How can I attach the top panel while allowing for seasonal wood movement?
Use metal figure-eight fasteners or tabletop Z-clips rather than rigid glue joints. Recess the fasteners into the top edges of the aprons with a Forstner bit, then screw upward into the 0.75-inch panel. This holds the top flat while letting it expand and contract.

Try TimberTinker for yourself.
Get TimberTinkerWant more like this? Leave your email and I'll send the good stuff only.