How to Build a Craft Table: The Classic Craft Table Plan
Build the Classic Craft Table at 52 by 22 inches using standard 2x4s, panel stock, and an exact 12-piece cut list modeled in TimberTinker.
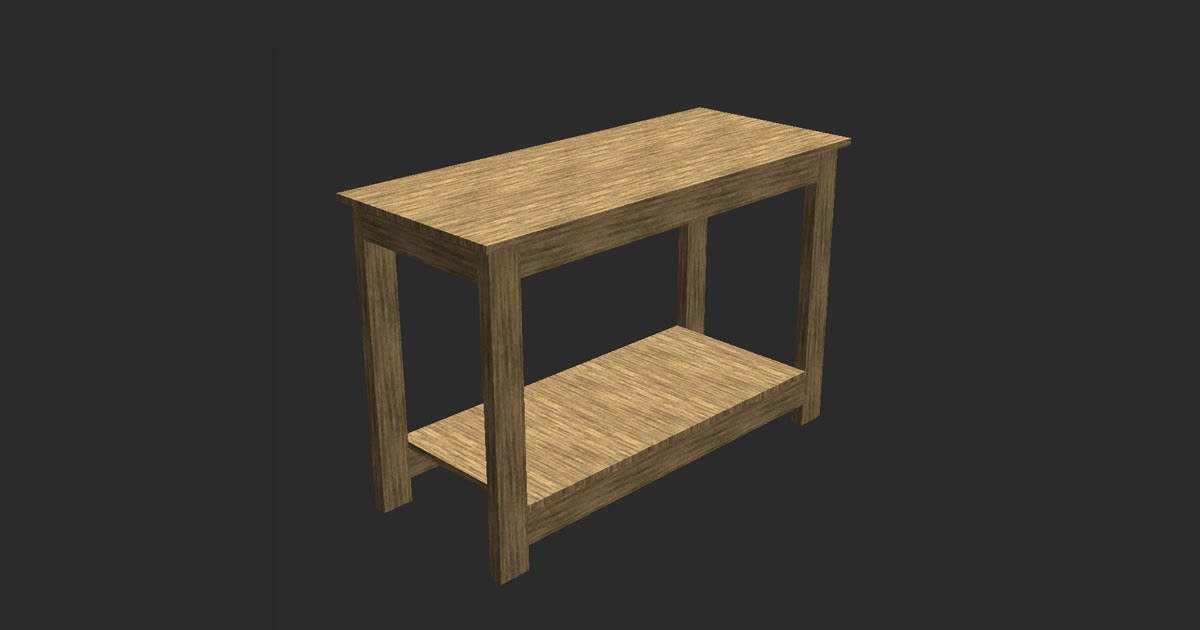
Learning how to build a craft table gives you a rock-solid work surface tailored to your space. This project covers the Classic Craft Table, an all-around workstation measuring 52 inches wide, 22 inches deep, and 34 inches tall. It relies on standard 2x4 framing lumber and 0.75-inch panel stock, assembled in four stages: legs, aprons, shelf, and top.
The plan was designed directly in TimberTinker, a 3D woodworking design app for iOS that is free to download for your first three projects. A companion build video captures the entire project board by board, allowing you to watch every cut and joint before heading to your garage.
| Finished size | 52 in wide × 22 in deep × 34 in tall |
|---|---|
| Lumber | 2x4, panel |
| Shelf height | 7 in |
| Pieces | 12 |
| Build order | legs → aprons → shelf → top |
Cut list
| Qty | Part | Lumber | Length |
|---|---|---|---|
| 4 | Leg | 2x4 | 33.25 in |
| 2 | Apron | 2x4 | 43 in |
| 2 | Apron | 2x4 | 17 in |
| 2 | Shelf | 2x4 | 43 in |
| 1 | Shelf | panel | 20 in |
| 1 | Top board | panel | 52 in |
Step by step
- Cut all 12 pieces from 2x4 lumber and 0.75-inch panel stock according to the cut list.
- Join two legs to each 17-inch apron to assemble two separate leg frame ends.
- Fasten the two 43-inch aprons between the leg ends to complete the perimeter upper frame.
- Mark 7 inches from the floor on each leg and attach the two 43-inch shelf stretchers.
- Fasten the 20-inch shelf panel across the lower 2x4 stretchers.
- Center the 52-inch top board over the frame with an even 1-inch perimeter overhang.
- Secure the top panel by driving screws upward through the underside of the aprons.
- Sand all surfaces and apply protective clear finish coats to the top board and shelf.
Classic Craft Table Dimensions and Working Height
The finished Classic Craft Table stands 34 inches tall, spans 52 inches wide, and measures 22 inches deep. Standard writing desks are 30 inches tall, whereas kitchen counters sit at 36 inches. A 34-inch surface hits an ergonomic middle ground. You can stand while slicing fabric with a rotary cutter without straining your lower back, or you can sit on an adjustable drafting stool to sketch and assemble small crafts.
The top board creates a 1-inch overhang past the frame along all four edges. That 1-inch lip gives you clearance to anchor bar clamps, mount task lights, or secure tape dispensers directly to the surface edge without colliding with the frame legs.
Down below, the storage shelf sits 7 inches up from the floor. This spacing leaves ample toe space when standing close to the table and keeps stored bins and material crates off dusty shop floors.
Materials and the 12-Piece Cut List
This project uses two common stock types: 2x4 framing lumber and panel material. A standard 2x4 has actual cross-section dimensions of 1.5 inches by 3.5 inches. The panel material has an actual thickness of 0.75 inches and comes at 43 inches wide. To create both surfaces, you crosscut the panel stock to length, then rip the shelf piece to 20 inches wide and crosscut the top board to 52 inches.
The entire table requires 12 pieces: • 4 × Leg (2x4): 33.25 inches • 2 × Apron (2x4): 43 inches • 2 × Apron (2x4): 17 inches • 2 × Shelf stretcher (2x4): 43 inches • 1 × Shelf (panel): 20 inches • 1 × Top board (panel): 52 inches
Because TimberTinker handles the shop math and nesting automatically, you can verify your cut layouts on your phone before making a single pass with your saw. You can also follow along with the companion build video, which demonstrates each step board by board using these exact components.
How to Build a Craft Table: Step-by-Step Assembly
Assembly follows an orderly four-step sequence: legs first, then aprons, then shelf, and finally the top. Begin with the legs. Take two 33.25-inch 2x4 legs and join them across the top using one 17-inch apron flush with the upper ends. Repeat this step for the other two legs and the second 17-inch apron. Check both end frames with a framing square to ensure 90-degree corners.
Next, connect the two end assemblies into a rigid four-legged structure using the two 43-inch aprons. Clamp the long aprons flush with the top outside faces of the legs and drive your fasteners. Once joined, the main table frame stands upright on its own.
Now install the lower shelf supports. Measure 7 inches from the bottom end of each leg and draw a clear layout line. Align the two 43-inch 2x4 shelf stretchers with these marks, clamp them in place, and screw them into the legs. Drop the 20-inch wide shelf panel directly onto the stretchers and fasten it down.
Complete the build by attaching the top. Position the 52-inch panel over the base frame, measuring an even 1-inch overhang along the front, back, and both sides. Drive fasteners up through the aprons into the underside of the panel so no hardware is exposed on your working face.
Sanding and Protective Finishing
Sand the 2x4 base with 120-grit sandpaper to remove any mill stamps and soften rough spots. Work your way up to 180-grit on the top work surface to produce a clean, smooth work area. Break the sharp cut edges of the panel with a sanding block so threads and fabric edges never snag on the corners.
Finish the top and shelf with two or three coats of clear polyurethane or water-based polycrylic. A satin clear coat protects the wood grain against craft glue, watercolor spills, and marker stains while cutting down on harsh glare from overhead work lights.
With 12 cut pieces, standard 2x4 lumber, and an orderly assembly sequence, the Classic Craft Table delivers a dependable, wobble-free work surface. Use the companion build video and TimberTinker plans to guide each cut, add your finish coats, and organize your craft room around a table built to last.
Questions
What tools are needed to build the Classic Craft Table?
You need a circular saw or miter saw for crosscuts, a table saw or track saw to rip the panel, a drill-driver for screws, a tape measure, clamps, and a speed square.
Where can I watch the board-by-board build process?
The companion build video walks through this exact TimberTinker plan board by board, covering cuts, pocket holes, and final assembly.

Try TimberTinker for yourself.
Get TimberTinkerWant more like this? Leave your email and I'll send the good stuff only.