How to Build a Coffee Table: Complete Pine DIY Guide
Build a durable 42x22-inch pine coffee table featuring a slatted lower shelf using standard construction lumber and simple joinery.
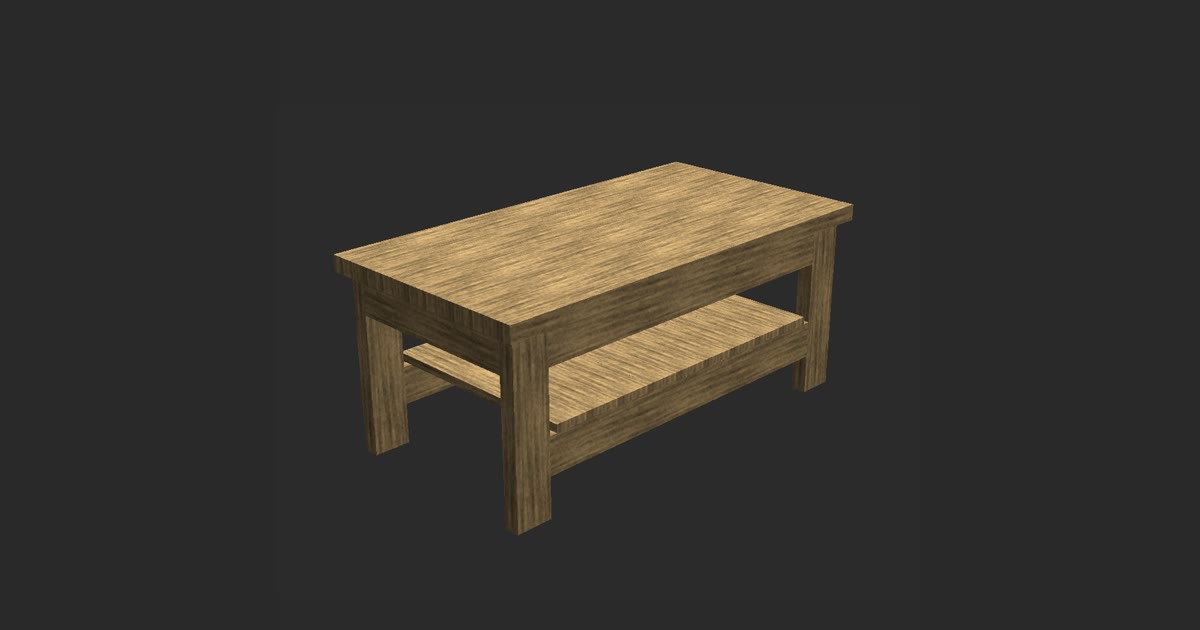
Learning how to build a coffee table starts with selecting straight dimensional lumber and assembling a four-leg apron frame. By cutting standard pine boards to size, joining them with pocket hole screws, and mounting a slatted shelf, you can build a coffee table that handles daily living room use.
This guide covers the exact 23-piece cut list, lumber dimensions, step-by-step frame assembly, and surface finishing techniques for an 18-inch tall pine coffee table.
| Finished size | 42 in wide × 22 in deep × 18 in tall |
|---|---|
| Lumber | 2x4, board, 2x6 |
| Pieces | 23 |
| Build order | legs → aprons → shelf → top |
Cut list
| Qty | Part | Lumber | Length |
|---|---|---|---|
| 4 | Leg | 2x4 | 16.5 in |
| 2 | Apron | 2x4 | 33 in |
| 2 | Apron | 2x4 | 17 in |
| 2 | Shelf | 2x4 | 33 in |
| 9 | Shelf | board | 20 in |
| 4 | Top board | 2x6 | 42 in |
Step by step
- Cut all 23 pieces to exact dimensions according to the lumber cut list.
- Drill pocket holes into the interior faces of the four aprons and two shelf stretchers.
- Assemble the two end frames by joining pairs of 16.5 in legs with the 17 in side aprons.
- Connect the end assemblies using the two 33 in aprons to complete the perimeter frame.
- Mount the two 33 in shelf stretchers between the legs 4 in up from the floor.
- Fasten the nine 20 in shelf slats across the stretchers using uniform 0.25 in spacing.
- Edge-join the four 42 in 2x6 boards to create the 42 in by 22 in tabletop.
- Center the frame beneath the top with a 1 in overhang and fasten it securely.
- Sand, condition, stain, and seal the entire table with a protective topcoat.
Coffee Table Dimensions and Lumber Sizing
Standard living room ergonomics dictate that a coffee table should sit level with or slightly below the seat cushions of your sofa. This coffee table measures 42 in wide, 22 in deep, and 18 in tall. The top overhangs the base frame by 1 in on all four sides. That leaves the underlying base footprint at 40 in wide by 20 in deep, giving your knees clearance while maintaining a stable center of gravity.
Working with construction-grade pine requires an understanding of nominal versus actual lumber dimensions. A nominal 2x4 board actually measures 1.5 in × 3.5 in in cross section. Similarly, a 2x6 board measures 1.5 in × 5.5 in, and the 1-by shelf board measures 0.75 in × 3.5 in. Failing to account for these milled dimensions can throw off your joinery across a full frame.
We planned these exact lumber profiles in TimberTinker before making any cuts. Modeling standard lumber dimensions digitally confirms that four 2x6 boards laid edge to edge equal exactly 22 in of surface depth (four boards at 5.5 in each). That math ensures your 1 in top overhang matches the 20 in deep base frame without any unexpected gaps.
Materials and Complete 23-Piece Cut List
To build this table, you need standard framing pine from the home center. Select boards that are straight and dry, avoiding pieces with severe crowning or loose knots near the edges. You will need 2x4 stock for the legs and frame rails, four 2x6 boards for the tabletop, and 1-by boards measuring 0.75 in × 3.5 in for the lower slatted shelf.
The project contains exactly 23 parts. For the primary frame, cut four legs from 2x4 stock at 16.5 in. Cut two long aprons from 2x4 stock at 33 in and two short aprons at 17 in. The lower shelf requires two 2x4 shelf stretchers at 33 in, which run parallel to the long aprons. You will also cut nine shelf slats from the 0.75 in × 3.5 in boards at 20 in.
The tabletop consists of four 2x6 boards cut to 42 in each. Before heading to the miter saw, check your board layouts against the cut list in TimberTinker to minimize scrap. Grouping identical cuts together on your stop block ensures duplicate pieces, such as the nine shelf slats, match in length down to the millimeter.
Step-by-Step Guide: How to Build a Coffee Table Base and Top
Assembly follows a strict sequence: legs first, aprons second, lower shelf third, and tabletop last. Begin by drilling pocket holes into the inside faces of your apron rails and shelf stretchers. Join the four 16.5 in legs together using the two 17 in side aprons and 2.5 in pocket screws. Keep the top of each apron flush with the top ends of the legs to create two matching side assemblies.
Next, link the two leg assemblies using the two 33 in long aprons. Clamp the pieces tightly on a flat workbench to ensure the corners remain square. Check corner-to-corner diagonal measurements with a tape measure; identical diagonals confirm your main frame is square. Drive 2.5 in pocket screws through the 33 in aprons into the legs.
Install the lower shelf structure next. Position the two 33 in shelf stretchers between the legs, roughly 4 in above the floor. Fasten them with pocket screws into the legs. Lay the nine 20 in shelf slats across the stretchers, spacing them evenly with a 0.25 in spacer block. Secure each slat to the stretchers with 1.25 in wood screws driven through predrilled countersink holes.
Assemble the tabletop by joining the four 42 in 2x6 boards along their edges using wood glue and pocket screws, or edge-glue them with bar clamps. Center the finished base frame upside down on the underside of the assembled top. Verify the 1 in overhang along all four edges, then secure the top to the apron rails using tabletop figure-eight fasteners or pocket screws driven through slotted pilot holes.
Sanding, Staining, and Protective Finishing
Pine is a softwood with uneven grain density, which means surface preparation determines the final look. Sand all exposed surfaces thoroughly before applying any color. Begin with 120-grit sandpaper on a random orbital sander to remove mill glaze, pencil lines, and surface imperfections. Follow with 150-grit, and complete your preparation with 220-grit paper. Hand-sand along the wood grain to clear away any microscopic swirl marks.
Soft pine absorbs liquid stain unevenly, which often creates dark blotches. Apply a coat of pre-stain wood conditioner with a foam brush or rag, allowing it to penetrate the fibers for 10 to 15 minutes before wiping away the excess. Apply your chosen wood stain within two hours of conditioning. Wipe the stain on along the grain, wait 5 minutes, and buff it dry with a lint-free cotton cloth.
Finish the coffee table with a protective topcoat to guard against water rings and scratches. Polyurethane provides long-lasting protection for pine furniture. Apply three thin coats of satin polyurethane, allowing each coat to dry according to the manufacturer instructions. Lightly scuff the dry surface with 320-grit sandpaper between coats, wipe away the dust, and let the final coat cure for 72 hours before use.
Building your own pine coffee table combines practical storage with durable construction. By sticking to precise lumber cuts, checking frame squareness, and properly conditioning the wood grain before sealing, you create a piece of furniture that holds up in your home for years.
Questions
How do you allow for natural wood movement when fastening a solid wood tabletop to the base?
Solid pine expands and contracts across its grain as indoor humidity changes. Instead of gluing the top directly to the aprons, use metal figure-eight fasteners or tabletop clips set into shallow mortises. You can also drill slotted pilot holes through the apron rails, which lets the mounting screws slide slightly without cracking the wood.
What is the best way to prevent soft pine lumber from warping or twisting over time?
Start by buying dry pine boards and letting them acclimate inside your workshop for a week before cutting. Fasten your tabletop boards edge-to-edge with alternating growth ring directions to balance tension. Finally, seal every side of the wood, including the underside of the top and lower shelf, so moisture levels remain balanced.

Try TimberTinker for yourself.
Get TimberTinkerWant more like this? Leave your email and I'll send the good stuff only.