How to Build a Bookshelf: Easy DIY Farmhouse Plan
Build a sturdy 54-inch farmhouse bookshelf using 2x4 lumber, wood panels, and a precise 15-piece cut list.
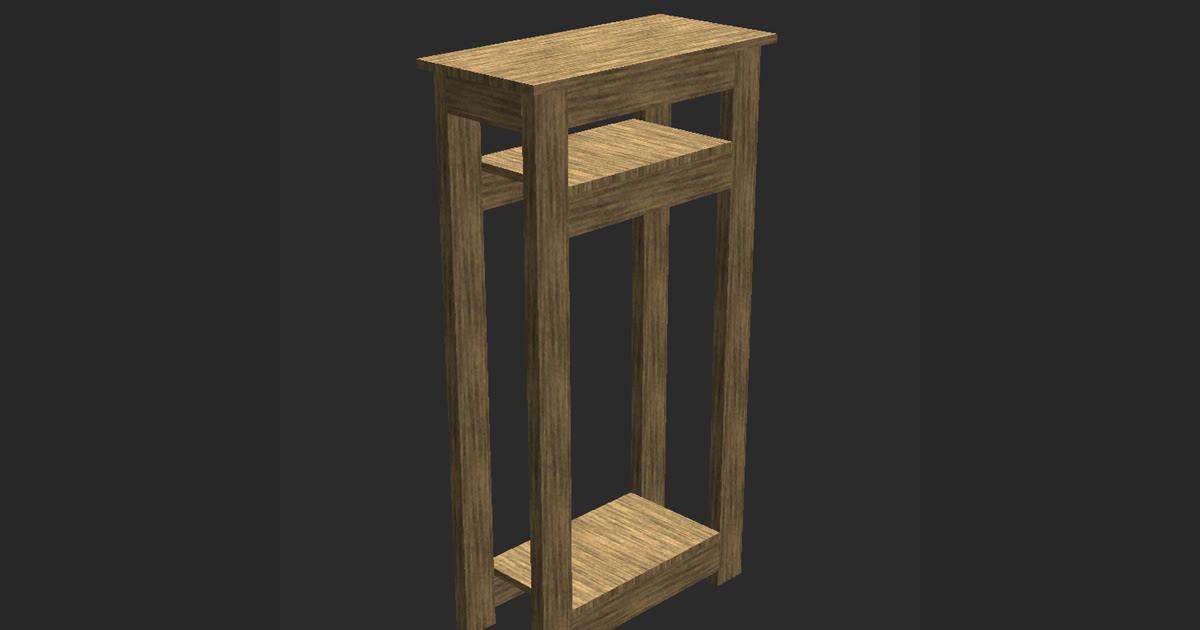
Learning how to build a bookshelf begins with accurate lumber cuts and solid joinery. This farmhouse design uses common 2x4 boards and flat panels to create a 54-inch tall bookcase that remains rigid under heavy loads.
This guide details the complete 15-piece cut list and step-by-step assembly instructions. Following this tested sequence helps you construct a durable farmhouse bookshelf from start to finish without wasting material.
| Finished size | 29 in wide × 14 in deep × 54 in tall |
|---|---|
| Lumber | 2x4, panel |
| Shelf heights | 6 in, 45 in |
| Pieces | 15 |
| Build order | legs → aprons → shelf-1 → shelf-2 → top |
Cut list
| Qty | Part | Lumber | Length |
|---|---|---|---|
| 4 | Leg | 2x4 | 53.25 in |
| 2 | Apron | 2x4 | 20 in |
| 2 | Apron | 2x4 | 9 in |
| 2 | Shelf-1 | 2x4 | 20 in |
| 1 | Shelf-1 | panel | 12 in |
| 2 | Shelf-2 | 2x4 | 20 in |
| 1 | Shelf-2 | panel | 12 in |
| 1 | Top board | panel | 29 in |
Step by step
- Cut the four 2x4 legs to 53.25 inches.
- Cut the 2x4 aprons into two pieces at 20 inches and two pieces at 9 inches.
- Cut four shelf support pieces from 2x4 lumber at 20 inches.
- Cut the two shelf inserts from panel stock to 12 inches.
- Cut the top board from panel stock to 29 inches.
- Drill pocket holes into the aprons and the 20-inch shelf supports.
- Join the legs with the 9-inch and 20-inch aprons to form the outer frame.
- Fasten the shelf-1 2x4 supports and 12-inch panel insert 6 inches above the leg base.
- Fasten the shelf-2 2x4 supports and 12-inch panel insert at the 45-inch mark.
- Attach the 29-inch top panel flush with the upper frame and apply your chosen finish.
Bookshelf Dimensions and Material Specifications
The completed bookshelf is 54 inches tall, measuring 29 inches wide by 14 inches deep. This footprint provides generous shelf space while remaining compact enough for tight hallways or home offices. Unlike traditional designs with wide overhangs, the top panel on this build sits flush with the outer frame edges. This flush design creates clean lines and gives the piece its distinct modern farmhouse profile.
The interior layout features two main shelves positioned inside the frame. The lower shelf sits 6 inches up from the floor, creating clearance underneath and establishing a balanced base. The upper shelf rests at 45 inches, leaving a tall intermediate opening for oversized books or storage bins. The remaining space above the 45-inch shelf gives you quick access to everyday items right beneath the top surface.
Standard construction lumber provides the core structure. Keep in mind that a standard 2x4 board actually measures 1.5 inches by 3.5 inches in finished dimensions. The smooth shelving surfaces and top board come from panel stock that measures 0.75 inches thick by 20 inches wide. This design was created in TimberTinker and built board by board on film, matching the video build. Planning in the app helps you verify how actual lumber dimensions align before you cut your stock.
The 15-Piece Cut List and Required Tools
This project requires exactly 15 pieces of lumber. The vertical frame uses 4 legs cut from 2x4 stock at 53.25 inches. The upper perimeter frame uses 4 aprons cut from 2x4 stock: 2 pieces at 20 inches for the front and back, and 2 pieces at 9 inches for the sides. The lower shelf assembly requires 2 pieces of 2x4 at 20 inches and 1 panel insert cut to 12 inches. The upper shelf assembly also uses 2 pieces of 2x4 at 20 inches and 1 panel insert cut to 12 inches. A single panel cut to 29 inches completes the flush top board.
You can inspect and confirm the full cut list in TimberTinker prior to setting your stop blocks. Using a miter saw with a stop block guarantees that identical parts, such as the four 53.25-inch legs and the six 20-inch 2x4 supports, match in length. Clean, square crosscuts are essential for tight joints when building with framing lumber.
For assembly, you will need a pocket hole jig, a drill, clamps, and wood glue. Join the 2x4 components using 2.5-inch pocket hole screws, which bite firmly into 1.5-inch thick wood. Fasten the 0.75-inch panel inserts using 1.25-inch pocket hole screws or countersunk wood screws driven from underneath.
How to Build a Bookshelf: Step-by-Step Assembly
Begin assembly with the four 53.25-inch legs and the apron pieces. Lay two legs flat on your workbench and connect them using one 9-inch apron at the top edge, securing the joint with wood glue and pocket screws. Repeat this step for the opposite side frame. Stand both side assemblies up and connect them using the two 20-inch aprons across the front and back to establish the 29-inch wide by 14-inch deep rectangular box.
Next, assemble and install the lower shelf, labeled shelf-1. Measure and mark 6 inches up from the bottom of each leg. Position the two 20-inch 2x4 shelf supports between the legs at this line, driving pocket screws into the leg faces. Slide the 12-inch panel insert into position on top of the framing supports and secure it firmly. This lower shelf ties the base of the frame together, preventing the legs from spreading.
Move up to the 45-inch mark on the legs to install shelf-2. Fasten the two 20-inch 2x4 framing supports directly across the legs, verifying that they are level. Fasten the second 12-inch panel insert onto these supports. Finally, place the 29-inch top panel board into the top opening. The top sits flush with the frame, leaving no overhang. Secure it from below through predrilled pocket holes in the aprons so no screw heads show on the finished surface.
Sanding, Farmhouse Finishing, and Sealing
Construction 2x4 boards arrive from the lumberyard with rounded edges and stamped ink marks. Use a random orbital sander with 80-grit sandpaper to remove mill stamps and smooth rough spots on the framing. Progress through finer grits to achieve an even surface across both the framing lumber and the panel shelves. Pay special attention to the flush top joints so the seam feels level to the touch.
A classic farmhouse finish pairs painted framing with natural wood surfaces. Apply primer and paint to the legs and aprons. For the shelf inserts and the top board, apply wood stain to highlight the grain. Wipe away excess stain with a rag to maintain an even tone.
Protect the finished bookshelf by applying a clear topcoat. Brush or spray clear polyurethane across all surfaces, especially the horizontal shelves where sliding books create friction. Scuff lightly between coats using fine abrasive pads, then wipe away dust before applying the final layer. Allow the finish to cure completely before loading the shelves.
Building a custom farmhouse bookshelf is a straightforward project that yields dependable storage for your home. By adhering to the 15-piece cut list and securing the shelves at 6 inches and 45 inches, you create a balanced piece built to last. Once sanded and finished, your handmade bookshelf is ready to display books and home decor.
Questions
Do I need to anchor this 54-inch bookshelf to the wall for safety?
Yes, anchoring any bookshelf that is 54 inches tall is a sensible safety precaution. While the 2x4 base provides stability, a loaded bookcase carries significant weight. Securing the upper rear apron to a wall stud using an anti-tip bracket prevents accidental tipping, especially in homes with small children or pets.
How much weight can the 2x4 framed shelves support without sagging?
The 20-inch shelf spans are reinforced by 1.5-inch by 3.5-inch framing members, which resist bending under heavy loads. When properly glued and screwed, each shelf level supports stacks of books or storage bins without noticeable center deflection.

Try TimberTinker for yourself.
Get TimberTinkerWant more like this? Leave your email and I'll send the good stuff only.