How to Build a Study Desk: DIY Woodworking Plan
Build a durable, flush-top minimalist study desk using standard dimensional lumber and an exact nine-piece cut list.
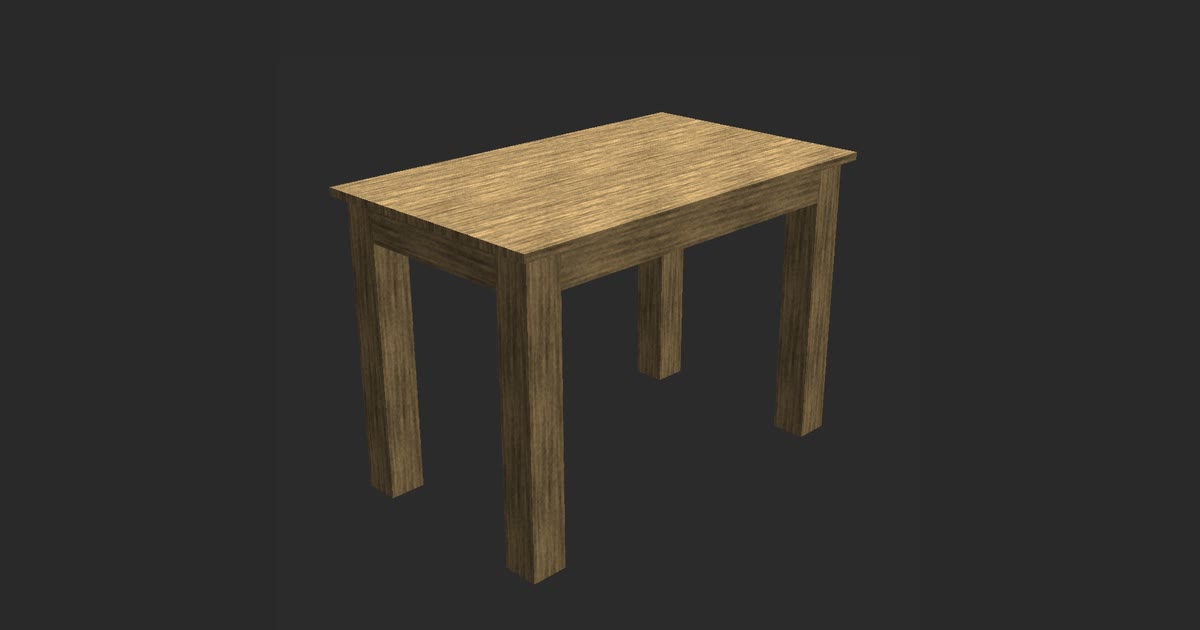
To build a study desk with clean lines and lasting stability, assemble a rigid base from four 4x4 legs and four 2x4 aprons, then mount a solid top panel flush with the outer frame. This compact 42x25x29-inch footprint fits easily into home offices or bedrooms while giving you ample space for a laptop, books, and task lighting.
This guide breaks down the full build process from raw lumber selection to final topcoat. You will find the exact nine-piece cut list, step-by-step assembly instructions, and tips for clean fastening.
| Finished size | 42 in wide × 25 in deep × 29 in tall |
|---|---|
| Lumber | 4x4, 2x4, panel |
| Pieces | 9 |
| Build order | legs → aprons → top |
Cut list
| Qty | Part | Lumber | Length |
|---|---|---|---|
| 4 | Leg | 4x4 | 28.25 in |
| 2 | Apron | 2x4 | 33 in |
| 2 | Apron | 2x4 | 16 in |
| 1 | Top board | panel | 42 in |
Step by step
- Cut four 4x4 legs to 28.25 inches using clean, ninety-degree cuts.
- Cut two 2x4 front and back aprons to 33 inches.
- Cut two 2x4 side aprons to 16 inches.
- Cut the 0.75-inch-thick by 25-inch-wide top panel to 42 inches.
- Drill pocket holes on the inner faces at both ends of each 2x4 apron.
- Fasten the two 16-inch side aprons between pairs of 4x4 legs to create two side frames.
- Join the two side frames together using the 33-inch front and back aprons.
- Position the 42x25-inch top panel flush with the perimeter of the 4x4 legs.
- Fasten the top panel from underneath through the 2x4 aprons with hidden screws.
Study Desk Dimensions and Flush-Frame Design
A dedicated workstation needs to balance surface area with overall footprint. This desk measures 42 inches wide, 25 inches deep, and 29 inches tall. A working height of 29 inches matches standard office seating, which keeps your forearms parallel to the floor during long typing sessions. Because the desk has no lower shelves beneath the surface, your knees and legs move freely without striking crossbars or dividers.
Instead of traditional overhanging table edges, this design features a top that sits entirely flush with the outer perimeter of the base frame. The 4x4 legs meet the 0.75-inch-thick panel edges directly at the perimeter. This flush alignment produces a crisp, modern aesthetic and lets you push the desk flat against corner walls without awkward gaps.
When planning projects like this, visual proportions matter. This desk was designed in TimberTinker to test the outer dimensions in 3D before making any sawdust. Verifying the 42x25-inch surface in a digital model helps you confirm your desk will fit your intended room layout before purchasing lumber.
Materials and the 9-Piece Cut List
Building furniture from construction lumber requires understanding nominal versus actual dimensions. A standard 4x4 post is actually 3.5 inches by 3.5 inches, while a 2x4 board measures 1.5 inches by 3.5 inches. The desktop surface uses a panel that is 0.75 inches thick and 25 inches wide. Knowing these true dimensions prevents layout mistakes when joining boards together.
The entire desk requires only nine pieces of wood. You will cut four 4x4 legs to 28.25 inches. For the horizontal base structure, cut two 2x4 aprons to 33 inches (for the front and back) and two 2x4 aprons to 16 inches (for the sides). Finally, crosscut the 0.75-inch-thick by 25-inch-wide top panel to 42 inches.
You can check your board breakdown using TimberTinker to generate an organized cut list grouped by stock type. Selecting straight, dry boards at the lumberyard ensures that these nine pieces fit together squarely without twisting your base frame during assembly.
How to Build a Study Desk: Step-by-Step Assembly
Start assembly with the four 4x4 legs. Cut each leg to 28.25 inches with clean, ninety-degree end cuts. Because construction posts sometimes have rounded corners or rough surfaces, sand the faces smooth before joining. Stand the legs on a flat workbench to check that all four match in height exactly so your desk sits level.
Next, build the apron subassemblies. Pocket hole joinery placed on the inside faces of the 2x4s provides hidden strength. Drill two pocket holes into both ends of the two 16-inch aprons and the two 33-inch aprons. Clamp each 16-inch side apron flush to the top inside edges of two 4x4 legs, then drive 2.5-inch pocket screws to form two U-shaped side assemblies. Connect these sides by fastening the two 33-inch front and back aprons between them.
Finish the assembly by mounting the desktop panel. Place the 42x25-inch top board onto the base. Align all four edges so the top sits flush with the outer faces of the 4x4 legs. Fasten the top from underneath using tabletop fasteners or upward-angled pocket screws through the 2x4 aprons. Driving screws from beneath secures the panel firmly without exposing screw heads on your clean work surface.
Sanding, Edge Easing, and Protective Finishes
A study surface demands a smooth texture that will not catch clothing or snag paper. Begin sanding the assembled desk using 80-grit sandpaper to level any minor seams between the aprons, legs, and top panel. Step up to 120-grit, and finish with 220-grit across all exposed surfaces. Wipe away fine dust with a vacuum and a tack cloth before applying any stain or clear coat.
Softening sharp corners makes everyday study sessions far more comfortable. Take a sanding block with 220-grit paper and run it along the top outer edges and the leg corners at a forty-five-degree angle. This slight edge relief prevents wood fibers from splintering if struck by chair arms and keeps sharp corners from digging into your forearms while typing.
Protect the pine lumber with a resilient topcoat. Apply two to three coats of water-based polyurethane or a durable hardwax oil to the entire frame and desktop. Polyurethane provides high resistance against water rings, pencil indents, and laptop heat. Lightly scuff between finish coats with 320-grit sandpaper to ensure a smooth, professional sheen on your finished desk.
With just nine pieces of dimensional lumber, this study desk delivers a clean, modern aesthetic and reliable rigidity. Follow the cut list, assemble your joints square, and you will have an enduring workstation ready for years of daily productivity.
Questions
What type of joinery works best for connecting 2x4 aprons to 4x4 legs?
Pocket hole joinery placed on the inside faces of the 2x4 aprons works best for this design. Using 2.5-inch pocket screws pulls the aprons tight against the 3.5x3.5-inch flat faces of the 4x4 legs, producing a strong joint while keeping all metal fasteners completely hidden from view.
Can I add a cable-management tray underneath this desk frame without compromising legroom?
Yes. Mounting a shallow wire basket or J-channel tray to the inside face of the 33-inch rear apron keeps power strips and cords organized. Because the tray attaches high up along the back apron, it remains out of sight without encroaching on your legroom.

Try TimberTinker for yourself.
Get TimberTinkerWant more like this? Leave your email and I'll send the good stuff only.